Last updated on August 3rd, 2024 at 02:42 pm
A good number of files and directories running in the background keep the macOS running smoothly. Tampering with them even accidentally could brick your device. It is for this reason; Apple hides such files by default. This makes things a bit difficult when you do need access to find something important. So, if you want any kind of help with troubleshooting or for another reason, we’ll tell you how to show hidden files on MacBook.
How to show hidden files on MacBook?
There are some common ways to show hidden files on MacBook like using the Finder application or Terminal app. However, the latter method appears to be less helpful than going through Finder. Plus, if you are a beginner, the commands and strings might seem too much for your need to solve a problem. Hence a word of caution follows before you proceed any further – Tweaking the default arrangement, especially with the hidden files may be more troublesome than useful if you’re not a power user.
Choose the Finder utility from your MacBook dock.

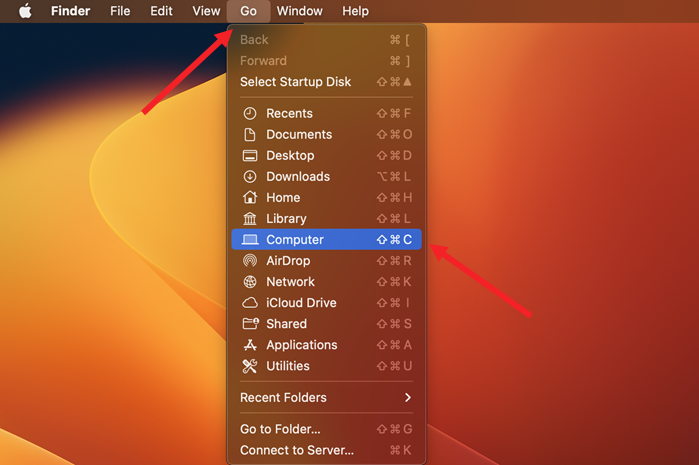
Select the Go menu from the Menu bar. It is a linear bar that runs along the top of the screen on your MacBook.

From the list of options displayed under the Go menu, scroll down to the Computer entry and select it.
Inside the Finder window, locate the Macintosh HD folder. When found double-click to open it.
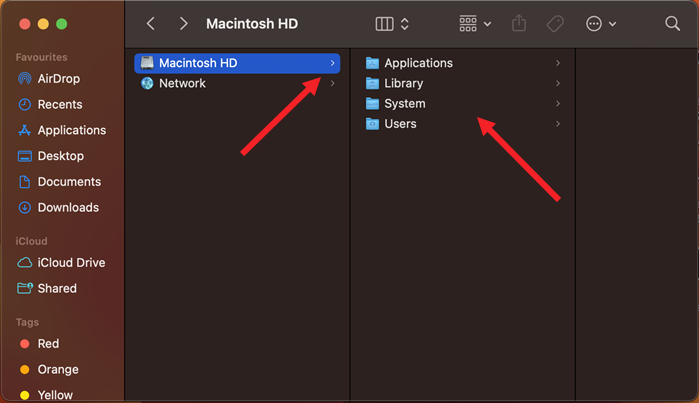
Now to make the hidden folders visible or show hidden files on Mac, press Command + Shift + ‘.’ (the period key) together.
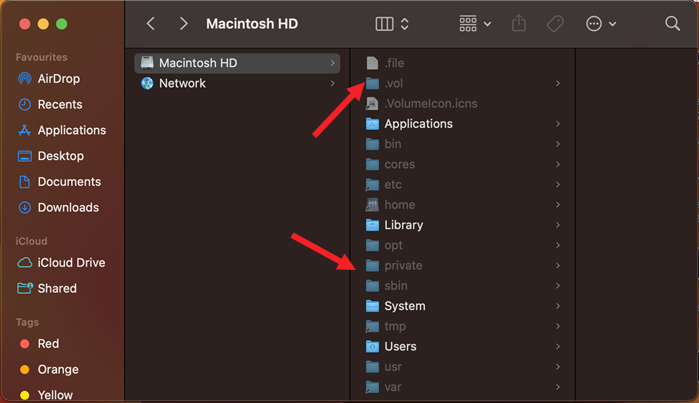
Instantly, you will notice that files and folders that were hidden earlier will now appear under the Macintosh HD window. You can also spot the hidden files by their icon type and name and icon type. Hidden file names begin with a period and their appearance is either semi-transparent or typically greyed out.
Is MacBook Finder not responding?
At times, Mac Finder can slow down or turn unresponsive. Here’s what you should do to fix it quickly. Press the CMD + Option + Esc keys on your Apple MacBook keyboard together. When a new window opens up, listing all the running applications, locate Finder’s entry and hit the Relaunch button to open it.
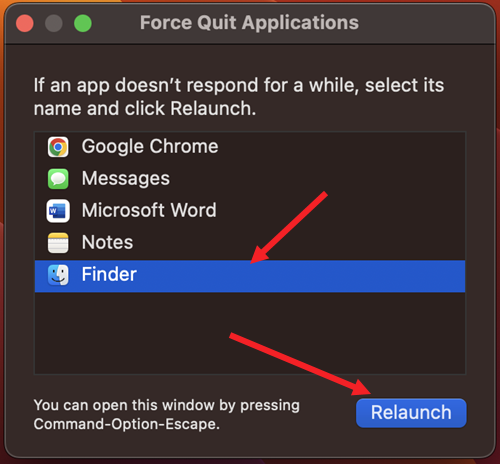
You should be able to use the Finder now, normally.
Hope it makes sense!
Ready for more tips? Check out our guide on How to convert PDF to JPG on a Mac and use Mac Option keys to execute different functions.


