Last updated on August 7th, 2024 at 06:54 am
The standard ear tips of AirPods Pro may not necessarily fit all ears the same way. Some are loose, some are tight while some fit just right. You can choose the desired ones by selecting the right size or let Apple determine it for you via its Ear Tip Fit test.
How to select ear tips of AirPods Pro?
AirPods are crafted to snugly fit right into your ear canal, rather than just sit in space outside your ears. For this reason, Apple encourages you to conduct a Ear Tip Fit test to help you find the right tip size. After all, your AirPods shouldn’t just sound better than any other wireless devices but also fit right!
On your iPhone, tap the Settings icon to go to the Settings screen.

Under the Settings screen, scroll down to the Bluetooth entry and select it. If your AirPods are connected to the iPhone, you’ll see its name listed under the Bluetooth screen. Just adjacent to the name, there’s an Infor (i) icon. Tap it!
On the info screen for your AirPods pro, you’ll find options related to Noise Control and a test to determine which tip provides the best seal. Hit the Ear Tip Fit test link at the bottom of the info screen to start the test.

When provided with information about the Ear Tip Fit test, press the Continue button to proceed further.

Place AirPods in both ears so they are comfortable and secure. Then, press Play to test the fit.

If the noise level is too high in your current location, you’ll be prompted to test ear tip fit in a quiet environment. Similarly, if the test suggests making some modifications like adjusting or trying different tips, try adjusting your AirPods Pro and test it again. Then try a different size. It’s quite possible that you might also need different sizes for your left and right ears.

Do not remove your AirPods until the test has finished. Check the Ear Tip Fit results.

Replacement ear tips
Your Apple earphones are shipped with three rubber earbud tips of different sizes including,
- Small silicone ear tips
- Medium silicone ear tips
- Large silicone ear tips

The medium size comes already fitted into AirPods while small and large sizes come bundled inside the box that your AirPods Pro comes with, under the tray, nestled inside the charging cable.
When you select the desired size, make sure it sits comfortably and securely. Also, see to it that the tip makes a good seal with your ear canal to offer rich bass sound, unmatchable sound quality, and superior noise cancellation.
Note – If the noise level is too high in your current location, you’ll be prompted to test ear tip fit in a quiet environment. Similarly, if the test suggests making some modifications like adjusting or trying a different AirPod Pro earbud tips, try adjusting your AirPods Pro and test it again. Then try a different size. It’s quite possible that you might also need different sizes for your left and right ears.
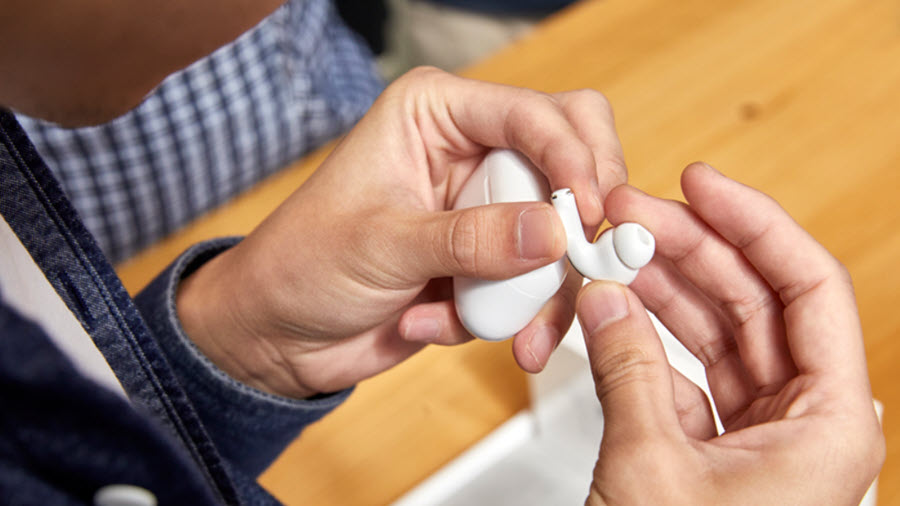
How to attach or remove ear tips

To attach an ear tip, align the ear tip with the oval-shaped connector on the individual earbud. With your fingers at the base of the ear tip, push the ear tip onto the connector until you hear it click into place. Similarly, to remove the ear tip pull firmly with your fingers at the base of the ear tip, where the ear tip connects to the AirPod.
Hope that makes sense!
Also read: How to find your misplaced AirPods.