Last updated on October 2nd, 2024 at 08:52 am
While iOS 18 brought plenty of mainstream updates, it also introduced a suite of innovative accessibility features tailored for individuals with disabilities. These features represent a positive step towards fostering inclusivity in technology. However, as with any new update, there can be a learning curve. So, to help you navigate these features seamlessly and ensure you haven’t missed any important enhancements, I’ve compiled this guide.
iOS 18’s Accessibility features for all fosters inclusivity
The Accessibility improvements which come in the form of Eye Tracking, Vehicle Motion Cues, Vocal Shortcuts, Music Haptics and Hover Typing have landed just a week after the company unveiled its new iPhone 16 lineup, Apple Watch Series 10, and more at its September event.
1] Built-in eye tracking
A big part of empowering users with disabilities to engage with technology seamlessly involves making them interact with their devices just as effectively as those without physical impairments. Controlling apps hands free happens to be one of those essentials. Built-in eye tracking in iOS 18 does that. Fueled by AI, this innovative functionality streamlines control via eye movements. The setup is surprisingly simple.
- Go to Settings.
- Choose Accessibility. Look for the Eye Tracking option then turn on Eye Tracking.
- Follow the onscreen instructions to calibrate Eye Tracking.
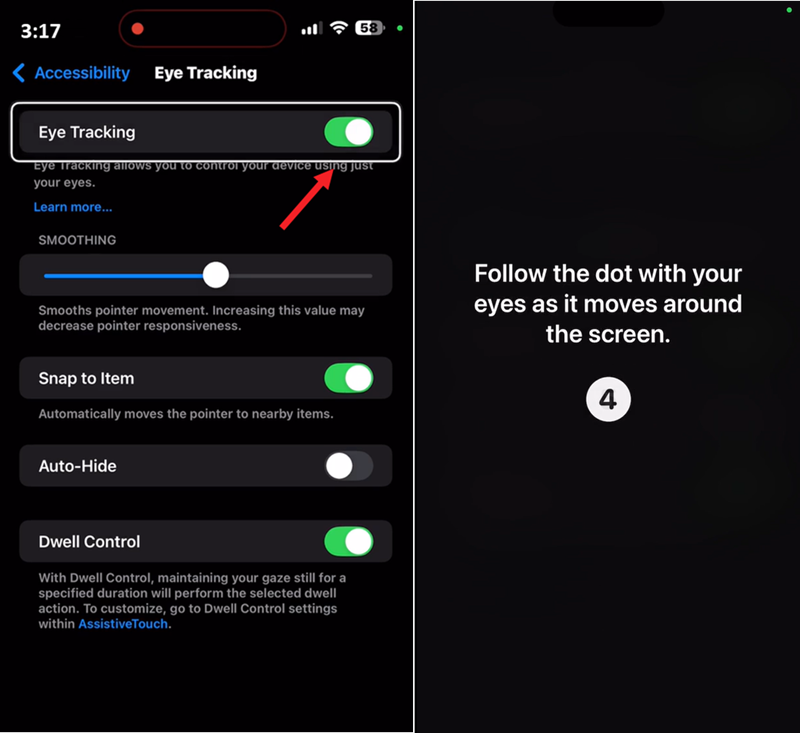
Once it’s on, your phone starts responding to your gaze. The on-device AI takes over, interpreting your gaze with remarkable accuracy. As your eyes move across the screen, elements light up under your gaze. Just hold your gaze for a moment to select something. It’s that intuitive.
There’s also a new Dwell Control to invoke system interactions like swipes and gestures hands-free.
While this may seem as great news for people with certain disabilities, for the rest of us it just means getting lazier than we already are.
Also, Eye tracking relies mainly on clear visual input. So, in low light or with harsh backlighting, your device might struggle to pick up on your eye movements, leading to missed or delayed selections.
If someone has an eye condition like strabismus, where eyes don’t align perfectly, or nystagmus, which causes rapid, involuntary movements of eyes, things can get even trickier. Their phone might misread your gaze, blinks, or small eye jerks as commands, making it harder to stay on track. So, although it bridges the gap for one type of disability, I wonder how it will tackle the other challenges.
Whatever it is, one thing’s for sure – your privacy isn’t compromised. All the data stays right there on your device, thanks to on-device machine learning.
2] Vehicle Motion Cues
People like me probably start feeling queasy the moment we settle into the passenger seat of a moving object such as a car. Add to that a winding road and a driver with a heavy foot, and my trip becomes utterly nauseated. It’s because of a not-so-fun phenomenon called kinetosis, or more commonly, motion sickness.
It happens because my brain gets mixed signals from my eyes and body about how I’m moving through space. Luckily, Apple has a new trick up its sleeve to tackle this problem. It’s called Vehicle Motion Cues. The feature sets up animated dots along the edges of my phone screen which helps it sync with the car’s movements to ease that sensory confusion and, hopefully, keep motion sickness at bay.
The logic behind this feature is simple: when in a moving vehicle and focusing on a stationary device like an iPhone or iPad, my brain can unknowingly become confused. The animated dots help to bridge this sensory gap, providing a visual cue that aligns with my physical sensations. This helps to prevent the dizziness and discomfort often associated with motion sickness.
- You can enable it by heading to Settings.
- Select Accessibility and go to the Motion heading.
- Enable Show Vehicle Motion Cues toggle.
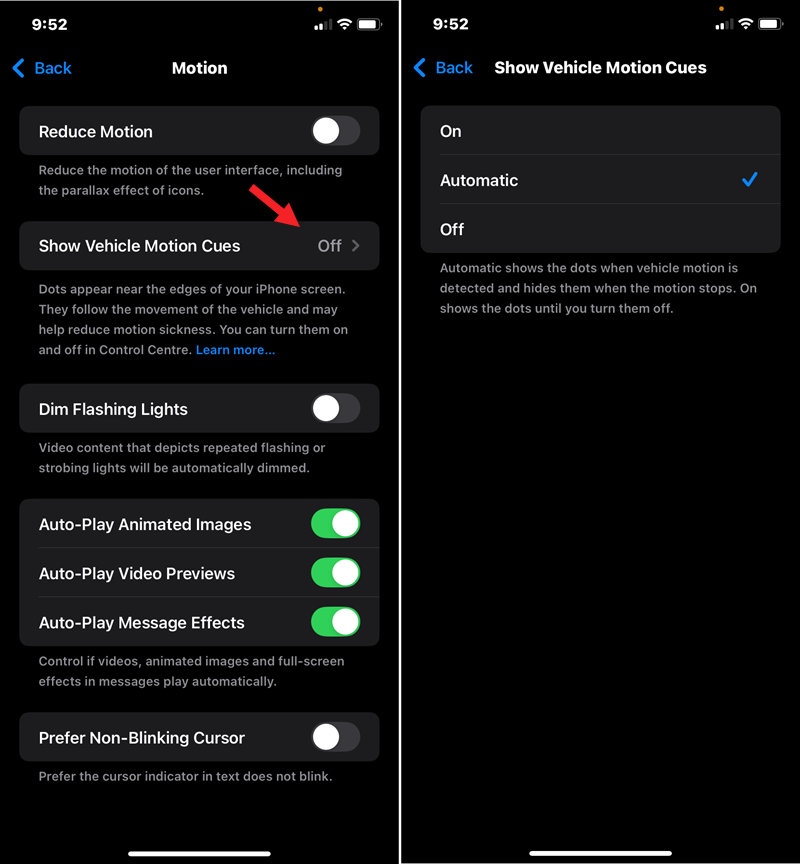
Note: Though Motion Cues feature does not eliminate motion sickness completely, it makes the task of using my iPhone or iPad in a moving vehicle much more tolerable.
3] Vocal Shortcuts
It is beneficial to have your desired action triggered instantly with a specific phrase rather than waiting for Siri to process your request and respond. Isn’t it? The Vocal Shortcuts feature in iOS 18 offers that automation of summoning information with a word.
For example, I can assign the word “Weather” as a shortcut to instantly get the forecast for the day or the next two days. This eliminates the need to say “Hey Siri” or explicitly invoke Siri. It’s like having a personalized command center at the tip of your tongue or teaching your phone a new language – your language.
- To set things up, Go to Settings, choose Accessibility.
- Expand the Vocal Shortcuts menu under SPEECH section by tapping it.
- Tap the Set Up Vocal Shortcuts option and follow the onscreen instructions.
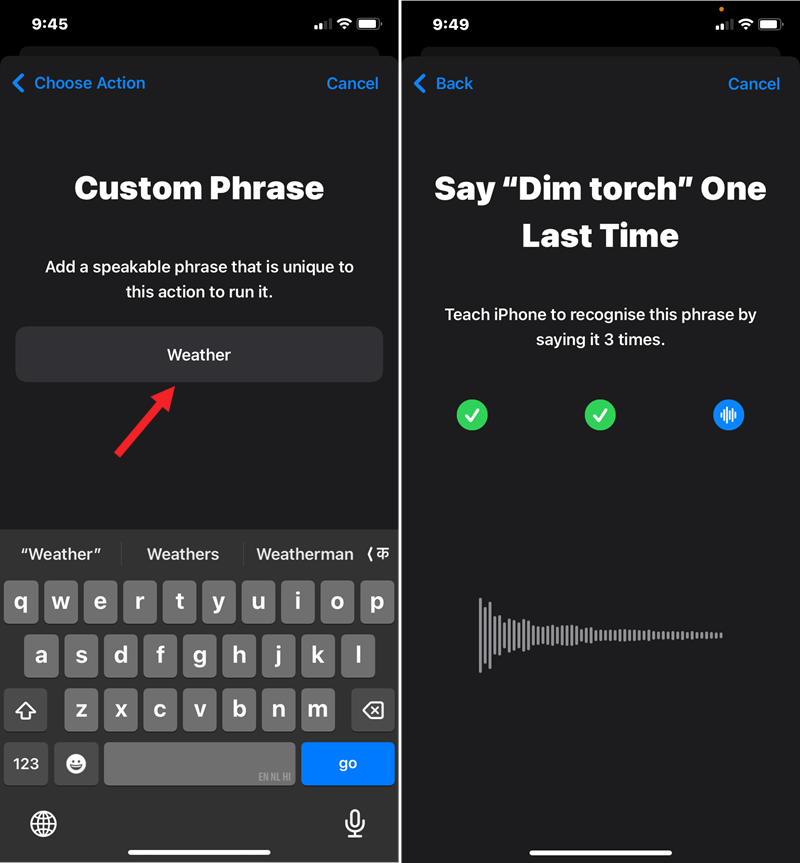
Here’s a thought to ponder: As our devices become more attuned to our voice commands, are we heading toward a future where typing and tapping fade into oblivion? Or will traditional input methods always have a seat at the table? Personally, I believe that while voice commands are getting smarter, typing and tapping will still be crucial for precision and privacy.
4] Music Haptics
The new Music Haptics feature is designed to transform your iPhone into a finely tuned instrument that syncs with the beat of the song you’re listening to. You can literally feel the rhythm and nuances of each track, with custom taps, textures, and refined vibrations enhancing your overall listening experience.
- To enable Music Haptics, go to Settings and scroll down to Accessibility.
- Look for the HEARING section.
- Under it, choose Music Haptics and toggle on the switch.
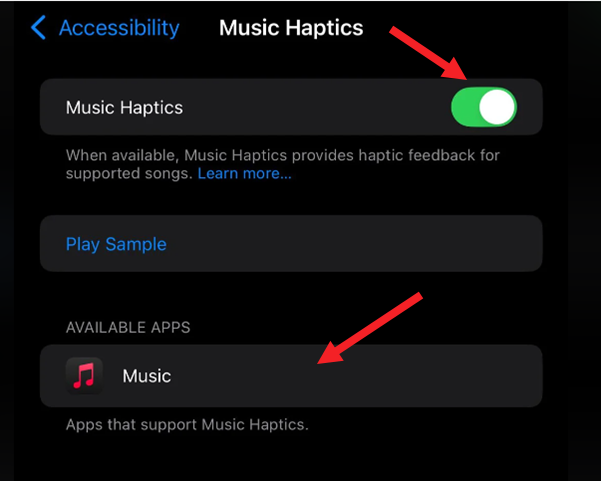
While Apple Music users are already riding the rhythmic waves of Music Haptics, I have little knowledge about its compatibility with other streaming services. But who knows, your favorite app might be the next to join the haptic harmony! By the way, Do you know the way to remove gaps of silence between songs using crossfade in Spotify and create a shared playlist that gives you social recommendations based on all of your music tastes.
5] Hover Typing
For individuals with mobility impairments, Hover Typing transforms the typing experience in two impactful ways. First, it removes the need for precise finger placement, letting users type effortlessly without having to touch the screen. Second, it lightens the load on weak hands, making the entire process far less strenuous. This innovative approach not only empowers users but also opens up new possibilities for seamless interaction with technology.
To enable Hover Typing, follow these steps:
- Open the Settings app on your device.
- Navigate to Accessibility.
- Select Keyboard & Typing under Accessories section.
- Tap on Hover Typing to enable it.
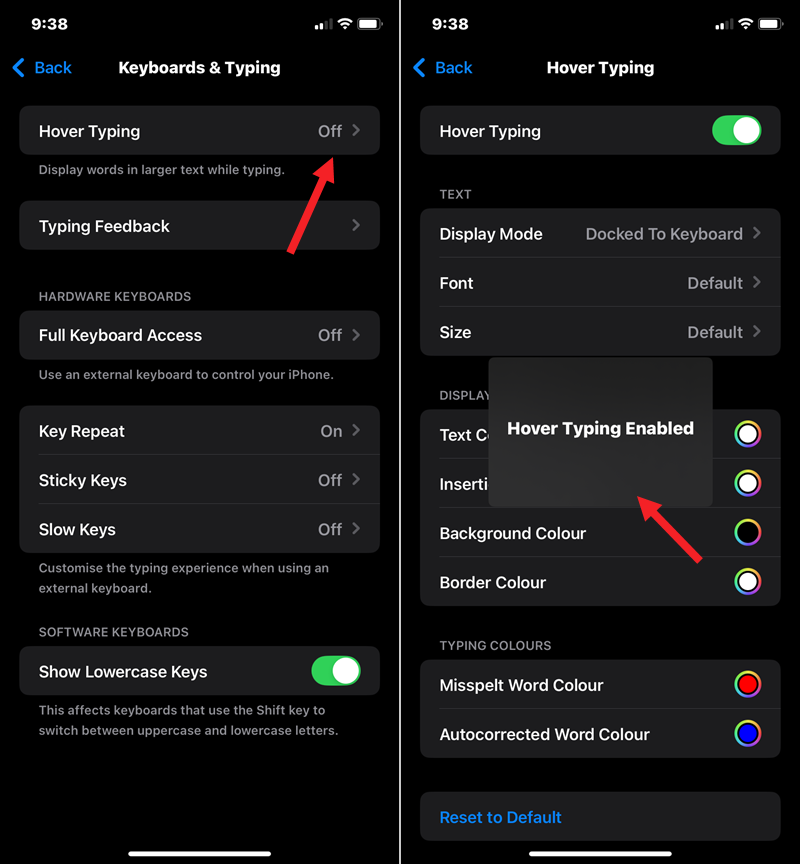
Beyond its benefits for those with disabilities, Hover typing also provides advantages for everyone. For instance, it allows you to interact with your iPhone while keeping your hands free, making it ideal for multitasking. Additionally, hover typing helps to prevent accidental touches that can be frustrating on traditional touchscreen devices.
As obvious, we can see that With iOS 18, Apple continues to push the boundaries of accessibility, making technology more inclusive and user-friendly for everyone. These updates rightly shows us how technology can truly adapt to our diverse and create a more equitable digital landscape. So, go ahead and explore—there’s something here for everyone.

